Key Takeaways:
- Learn the simple steps to replace old or damaged ski pole baskets with new ones.
- Understand the importance of choosing the right size and type of replacement basket for your ski poles.
- Discover tips and tricks to make the replacement process easier and ensure your ski poles are ready for the slopes.

Ski poles are an essential part of your skiing equipment, providing balance, rhythm, and support as you glide down the slopes. But what happens when the baskets of your ski poles become worn out or break? Replacing ski pole baskets is a straightforward task that you can do at home with a few tools and some know-how. This article will walk you through the process of how to replace ski pole baskets, ensuring your equipment is in top condition for your next snowy adventure.
Introduction to Ski Pole Baskets
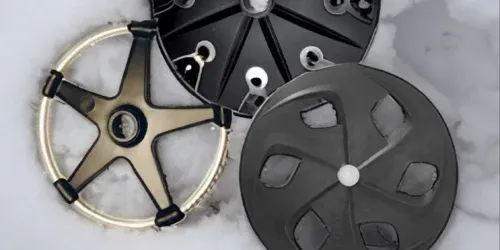
Ski pole baskets are the circular or star-shaped discs located near the tip of the pole. They serve to prevent the pole from sinking too deeply into the snow, providing stability and support. Over time, these baskets can wear out or become damaged, necessitating replacement. Whether you're dealing with old baskets that have seen better days or you're looking to upgrade to powder baskets for better performance in deep snow, knowing how to replace them is a valuable skill.
Identifying When Replacement is Needed
The first step in the replacement process is to determine whether your ski pole baskets need replacing. Look for signs of significant wear, such as cracks, breaks, or a loose fit that could cause the basket to fall off. If your baskets are not providing the support they once did, or if they don't fit properly anymore, it's time to search for new ones.
Selecting the Right Replacement Basket
Choosing the right replacement basket is crucial. The new baskets should match the diameter of your pole shafts to ensure a secure fit. Additionally, consider the type of skiing you do most often. Powder baskets are larger and designed for deep snow, while smaller baskets are better suited for groomed trails. Visit your local ski shop or explore online retailers to find the perfect pair of new baskets for your poles.
Tools and Equipment Needed
Before you start the replacement process, gather the necessary tools and equipment. You'll need a hair dryer or heat gun, a cloth, a wrench (optional), and the new baskets. A blow dryer is often sufficient to warm the old glue and make the old baskets easier to remove. Keep these tools handy as you prepare to remove the old baskets.
Removing the Old Baskets
To remove the old baskets, you'll need to apply heat to soften the glue or plastic that holds them in place. Using a hair dryer or heat gun, carefully warm the area around the old baskets. Once the material is pliable, gently pull the old ones off the pole shaft. Take caution to avoid damaging the pole itself.
Preparing the Pole Shafts
After removing the old baskets, clean the pole shafts to remove any residual glue or debris. Wipe them down with a cloth, ensuring they are free of any material that could prevent the new baskets from fitting properly. This step is crucial for a smooth installation of the new baskets.
Installing the New Baskets
With the pole shafts clean and ready, it's time to install the new baskets. If your replacement baskets came with instructions, follow them closely. Typically, you'll need to heat the new baskets in hot water or with a blow dryer to make them more flexible. Then, align the baskets with the pole shafts and press them on firmly. You may need to tap them gently with a hammer to secure them in place.
Ensuring a Proper Fit
Once the new baskets are on, check to ensure they fit properly and are securely attached. Give them a gentle tug to make sure they won't come off when you hit the slopes. If they feel loose, you may need to apply additional heat and pressure to form a tighter bond.
Troubleshooting Common Issues
When replacing ski pole baskets, you might encounter a few hiccups along the way. If you find that the new basket doesn't seem to fit snugly, don't be afraid to use a bit more force. Sometimes, especially in cooler temperatures, the plastic can contract, making it a tighter fit. A pro tip is to dip the basket in boiling water for a few seconds to make it more pliable. Just be sure to wear a glove to protect your hand from the heat. This can often make the installation process smoother and prevent damage to the basket or pole.
In some cases, you may notice that the pole doesn't sit quite right with the new basket. This could be due to a mismatch in design or a defect in the basket itself. Before you post a comment on the supplier's website or return the product, double-check the model and size. If everything seems correct, reach out to the supplier for additional information or assistance. They may have insights or can offer a replacement that will tailor to your needs, ensuring that you can get back to the slopes without further delay.

Customizing Your Ski Poles
For those who love creating a personalized touch to their ski gear, customizing ski poles can be a fun project. You can start by selecting a basket that complements your skis or adds a pop of color. Some skiers even like to use wood or metal to craft a unique basket, though this requires a bit more skill and the right tools. If you're interested in going this route, there are plenty of online tutorials and forums where you can develop your technique and share your experience with fellow enthusiasts.
Remember, the grip of your ski pole is just as important as the basket. If you're feeling adventurous, why not customize the grip as well? There are various materials and designs available that can improve comfort or grip, especially if you're skiing in a resort with varying conditions. You might want to consider a grip that's easier to hold with a glove or one that's ergonomically designed to reduce fatigue. With a lighter grip, you might even improve your maneuverability, making those sharp turns and tailoring your skiing to the terrain a bit easier.
Testing Your Ski Poles
Before heading back to the snow, test your ski poles to ensure the new baskets are functioning as they should. Take them out on a gentle slope and push them into the snow. They should provide the same level of support as your old baskets did, without sinking too deeply or coming loose.
Maintenance and Care
To prolong the life of your new ski pole baskets, take care of them by avoiding harsh impacts and storing your poles properly. Regularly check the baskets for signs of wear and replace them as needed to maintain optimal performance.

Summary
Replacing ski pole baskets is a simple yet essential maintenance task that can enhance your skiing experience. By following these steps, you can ensure your ski poles are equipped with baskets that fit properly and provide the necessary support on the slopes. Remember to choose the right replacement basket, use the proper tools, and take care when installing the new ones. With your ski poles ready, you can hit the snow with confidence and enjoy happy skiing through the seasons.

FAQs
Can I replace ski pole baskets myself, or should I take them to a shop?
You can definitely replace ski pole baskets yourself. It's a straightforward process that requires minimal tools and can be done at home. However, if you're uncomfortable with the process or lack the necessary equipment, visiting a ski shop is a good option.
How do I know what size replacement basket to buy for my ski poles?
Measure the diameter of your pole shafts to determine the size of the replacement basket you need. The new baskets should match the diameter of your poles to ensure a secure fit. If you're unsure, you can take your poles to a ski shop for assistance.
Is it necessary to use a hair dryer or heat gun when replacing ski pole baskets?
Yes, using a hair dryer or heat gun is often necessary to soften the old glue or plastic, making it easier to remove the old baskets and install the new ones. Be sure to apply heat carefully to avoid damaging the pole shafts.
Related Articles:


