

Fly tying is an art that combines creativity, patience, and skill. For many anglers, tying their own flies is not just a hobby but a way to connect more deeply with the sport of fly fishing. Creating your own flies allows you to customize patterns to match local waters and target specific fish species. Plus, there's nothing quite like the satisfaction of catching fish on a fly you tied yourself.
Key Takeaways:
- Understanding the Basics: Learn the essential tools and materials needed for fly tying.
- Step-by-Step Instructions: Follow detailed steps to create popular fly patterns.
- Tips and Tricks: Discover expert tips to enhance your fly tying skills.
Essential Tools and Materials
Before you start tying flies, you'll need to gather some essential tools and materials. The basic tools include a vise to hold the hook steady, scissors for cutting materials, a bobbin to hold the thread, and a whip finisher for tying off the thread. Other useful tools include hackle pliers, a bodkin, and a dubbing needle.
When it comes to materials, the options are endless. Common materials include hooks, thread, feathers, fur, and synthetic fibers. For example, the pheasant tail nymph requires pheasant tail feathers, copper wire, and peacock herl. Wet flies often use soft hackle feathers, while dry flies might incorporate deer hair or CDC feathers. Visit your local fly shop to explore the wide range of materials available and get advice on what works best for your local waters.
Understanding Fly Patterns
Fly patterns are essentially recipes for tying specific types of flies. Each pattern has its own unique combination of materials and tying techniques. Some popular fly patterns include the Wooly Bugger, Pheasant Tail Nymph, and Adams Dry Fly. Understanding these patterns is crucial for creating effective flies that catch fish.
For example, the Wooly Bugger is a versatile pattern that can imitate a variety of aquatic creatures, from leeches to baitfish. It typically features a marabou tail, chenille body, and palmered hackle. The Pheasant Tail Nymph, on the other hand, is a classic pattern that mimics mayfly nymphs. It uses pheasant tail fibers for the tail, body, and wing case, with copper wire for ribbing. By learning these patterns, you'll be able to tie flies that are effective in different fishing conditions.
Creating Dry Flies
Dry flies are designed to float on the surface of the water and imitate adult insects. Tying dry flies requires a bit more finesse, as the materials and techniques used are crucial for ensuring the fly floats properly. Popular dry fly patterns include the Adams, Elk Hair Caddis, and Royal Wulff.
For example, the Adams Dry Fly is a versatile pattern that can imitate a variety of mayflies. It features a tail made of mixed grizzly and brown hackle fibers, a body of gray dubbing, and wings made of grizzly hackle tips. The hackle is wrapped around the hook shank to create a collar that helps the fly float.
To tie an Adams Dry Fly, start by securing the hook in the vise and attaching the thread. Tie in the tail fibers and wrap the thread forward to the eye of the hook. Attach the wings and wrap the hackle around the hook shank. Finally, whip finish the thread and apply head cement. This fly is a must-have for any fly box and is particularly effective during mayfly hatches.
Tying Wet Flies
Wet flies are designed to sink below the surface and imitate submerged insects or other aquatic creatures. These flies are often tied with soft hackle feathers that move naturally in the water, making them highly effective at attracting fish. Popular wet fly patterns include the Soft Hackle, Partridge and Orange, and March Brown.
For example, the Soft Hackle is a simple yet effective pattern that can imitate a variety of insects. It features a body made of silk or floss, ribbing of fine wire, and a collar of soft hackle feathers. To tie a Soft Hackle, start by securing the hook in the vise and attaching the thread. Wrap the body material around the hook shank and secure it with the thread. Attach the hackle feather and wrap it around the hook shank to create a collar. Whip finish the thread and apply head cement.
Wet flies are particularly effective in fast-moving water, where their lifelike movement can attract fish that might not be interested in other flies.
Using a Dubbing Loop
A dubbing loop is a technique used to create a fuzzy, textured body on a fly. This technique is particularly useful for tying nymphs and other flies that require a buggy appearance. To create a dubbing loop, start by securing the hook in the vise and attaching the thread. Form a loop with the thread and secure it with a few wraps.
Next, insert dubbing material into the loop and twist the loop to create a tight, fuzzy rope. Wrap the dubbing loop around the hook shank to form the body of the fly. Secure the loop with the thread and trim any excess. This technique can be used with a variety of dubbing materials, including natural fur and synthetic fibers.
Using a dubbing loop allows you to create flies with a lifelike appearance that can attract fish in a variety of fishing conditions.
Adding Legs and Wings
Adding legs and wings to a fly can make it more lifelike and increase its effectiveness. For example, adding rubber legs to a nymph pattern can create additional movement in the water, making the fly more attractive to fish. To add legs, start by securing the hook in the vise and attaching the thread. Tie in the legs on either side of the hook shank and secure them with the thread.
Wings can be added to dry flies and wet flies to imitate the wings of adult insects. For example, the Royal Wulff dry fly features wings made of calf tail or synthetic fibers. To add wings, start by securing the hook in the vise and attaching the thread. Tie in the wing material on top of the hook shank and secure it with the thread. Trim the wings to the desired length and shape.
Adding legs and wings to your flies can make them more effective at attracting fish and increase your chances of a successful catch.

Choosing the Right Hook
Choosing the right hook is crucial for tying effective flies. Hooks come in a variety of sizes and shapes, each designed for specific types of flies and fishing conditions. For example, dry fly hooks are typically lighter and have a wider gape to help the fly float, while nymph hooks are heavier and have a narrower gape to help the fly sink.
When choosing a hook, consider the size and type of fly you're tying, as well as the fish species you're targeting. For example, a size 14 hook is a good choice for tying small dry flies, while a size 8 hook is better suited for larger nymphs and streamers. Visit your local fly shop for advice on the best hooks for your specific needs.
Using the right hook can make a big difference in the effectiveness of your flies and increase your chances of catching fish.
Experimenting with Color Schemes
Experimenting with different color schemes can help you create flies that are more effective in different fishing conditions. For example, using bright colors like chartreuse and orange can make your flies more visible in murky water, while natural colors like brown and olive can make your flies more realistic in clear water.
When experimenting with color schemes, consider the local insect population and the fish species you're targeting. For example, if you're fishing for trout in a river with a lot of mayflies, try tying flies in shades of brown and olive to match the natural insects. If you're fishing in a lake with a lot of baitfish, try using bright colors to attract attention.
Experimenting with different color schemes can help you create flies that are more effective in different fishing conditions and increase your chances of a successful catch.
Tips for Tying Small Flies
Tying small flies can be challenging, but with a few tips and tricks, you can create effective patterns that catch fish. First, use a magnifying glass or fly tying lamp to help you see the small details. Second, use fine thread and small hooks to create delicate patterns. Third, keep your materials organized and within reach to make the tying process more efficient.
When tying small flies, it's important to pay attention to the proportions and details. For example, the tail should be about the same length as the hook shank, and the body should be slender and tapered. Use small, delicate materials like CDC feathers and fine dubbing to create lifelike patterns.
With practice and patience, you can master the art of tying small flies and create patterns that are highly effective at catching fish.
Tying Big Bugs
Tying big bugs can be a lot of fun and can result in highly effective patterns for catching larger fish. Big bugs like streamers and bass bugs often use larger hooks and more substantial materials, such as deer hair, marabou, and synthetic fibers. These flies are designed to imitate larger prey, such as baitfish and frogs.
When tying big bugs, start by securing the hook in the vise and attaching the thread. Use larger materials to create a bulky body and add features like legs and wings to make the fly more lifelike. For example, a deer hair bass bug might feature a spun deer hair body, rubber legs, and a marabou tail.
Tying big bugs can be a great way to target larger fish and add variety to your fly box.
Using Copper Wire for Ribbing
Copper wire is a versatile material that can be used for ribbing, weighting, and adding flash to your flies. Ribbing with copper wire can add durability and segmentation to the body of a fly, making it more lifelike and effective. To use copper wire for ribbing, start by securing the hook in the vise and attaching the thread. Tie in a piece of copper wire at the bend of the hook and wrap the thread forward.
Next, wrap the body material around the hook shank and secure it with the thread. Wrap the copper wire forward in evenly spaced turns to rib the body and secure it with the thread. Trim any excess wire and whip finish the thread. This technique can be used with a variety of fly patterns, including nymphs and wet flies.
Using copper wire for ribbing can add durability and realism to your flies, making them more effective at catching fish.
Creating a Dubbing Loop
A dubbing loop is a technique used to create a fuzzy, textured body on a fly. This technique is particularly useful for tying nymphs and other flies that require a buggy appearance. To create a dubbing loop, start by securing the hook in the vise and attaching the thread. Form a loop with the thread and secure it with a few wraps.
Next, insert dubbing material into the loop and twist the loop to create a tight, fuzzy rope. Wrap the dubbing loop around the hook shank to form the body of the fly. Secure the loop with the thread and trim any excess. This technique can be used with a variety of dubbing materials, including natural fur and synthetic fibers.
Using a dubbing loop allows you to create flies with a lifelike appearance that can attract fish in a variety of fishing conditions.
Adding Flash to Your Flies
Adding flash to your flies can make them more visible and attractive to fish. Flash materials, such as tinsel and flashabou, can be used to add sparkle and movement to your flies. To add flash, start by securing the hook in the vise and attaching the thread. Tie in a piece of flash material at the bend of the hook and wrap the thread forward.
Next, wrap the flash material around the hook shank to create a flashy body or ribbing. Secure the flash material with the thread and trim any excess. This technique can be used with a variety of fly patterns, including streamers and nymphs.
Adding flash to your flies can make them more effective at attracting fish and increase your chances of a successful catch.
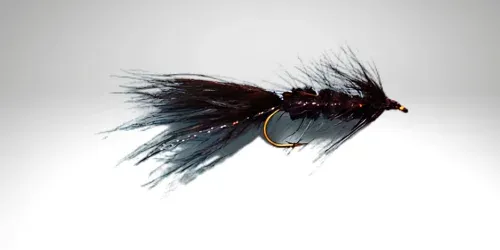
Step-by-Step Guide to Tying a Wooly Bugger
The Wooly Bugger is a great fly for beginners because it's relatively simple to tie and highly effective at catching fish. Here's a step-by-step guide to tying this popular pattern:
- Start by securing the hook in the vise. Attach the thread to the hook shank and wrap it back to the bend.
- Tie in a marabou feather for the tail. The tail should be about the same length as the hook shank.
- Attach a piece of chenille to the hook shank. Wrap the thread forward to the eye of the hook.
- Wrap the chenille around the hook shank to form the body. Secure it with the thread and trim any excess.
- Tie in a hackle feather at the front of the body. Palmer the hackle back towards the tail, making evenly spaced wraps.
- Secure the hackle with the thread and trim any excess. Whip finish the thread and apply a drop of head cement to secure the knot.
By following these steps, you'll create a Wooly Bugger that can attract attention and catch fish in a variety of fishing conditions.
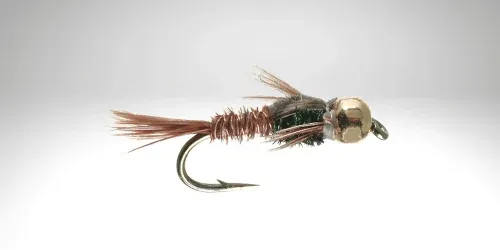
Tying a Pheasant Tail Nymph
The Pheasant Tail Nymph is another essential pattern for any fly box. It's particularly effective for catching trout and other fish that feed on mayfly nymphs. Here's how to tie it:
- Secure the hook in the vise and attach the thread. Wrap the thread back to the bend of the hook.
- Tie in a small bunch of pheasant tail fibers for the tail. The tail should be about half the length of the hook shank.
- Attach a piece of copper wire to the hook shank. This will be used for ribbing the body.
- Tie in a bunch of pheasant tail fibers for the body. Wrap the fibers forward to form a slender body and secure them with the thread.
- Wrap the copper wire forward in evenly spaced turns to rib the body. Secure the wire with the thread and trim any excess.
- Tie in another bunch of pheasant tail fibers for the wing case. Fold the fibers back over the body and secure them with the thread.
- Create a small thorax with peacock herl or dubbing. Fold the wing case fibers forward over the thorax and secure them with the thread.
- Whip finish the thread and apply a drop of head cement.
This pattern is highly effective and can be tied in various sizes to match the local insect population.
Summary
Tying your own flies is a rewarding and creative aspect of fly fishing. By understanding the essential tools and materials, mastering popular fly patterns, and experimenting with different techniques, you can create flies that are highly effective at catching fish. Whether you're tying a simple Wooly Bugger or a delicate Adams Dry Fly, the satisfaction of catching fish on a fly you tied yourself is unmatched.
FAQs
What are the essential tools for fly tying?
The essential tools for fly tying include a vise, scissors, bobbin, whip finisher, hackle pliers, bodkin, and dubbing needle.
What materials do I need to tie a Pheasant Tail Nymph?
To tie a Pheasant Tail Nymph, you'll need pheasant tail fibers, copper wire, peacock herl, and a hook.
How can I make my flies more effective at catching fish?
To make your flies more effective, experiment with different color schemes, add legs and wings for realism, and use flash materials to attract attention.
Related articles: